Most Meshtastic users assume the mesh is entirely off-grid. And most of the time, it is. You can be in a field with no phone signal, swap messages with someone a few kilometres away, and the internet never enters the picture.
But there is another mode. Your mesh can talk to an MQTT broker on the internet, and through that broker, bridge messages with other Meshtastic meshes in completely different cities. That is what the Meshtastic MQTT setup is for, and it changes the effective range of the whole system.
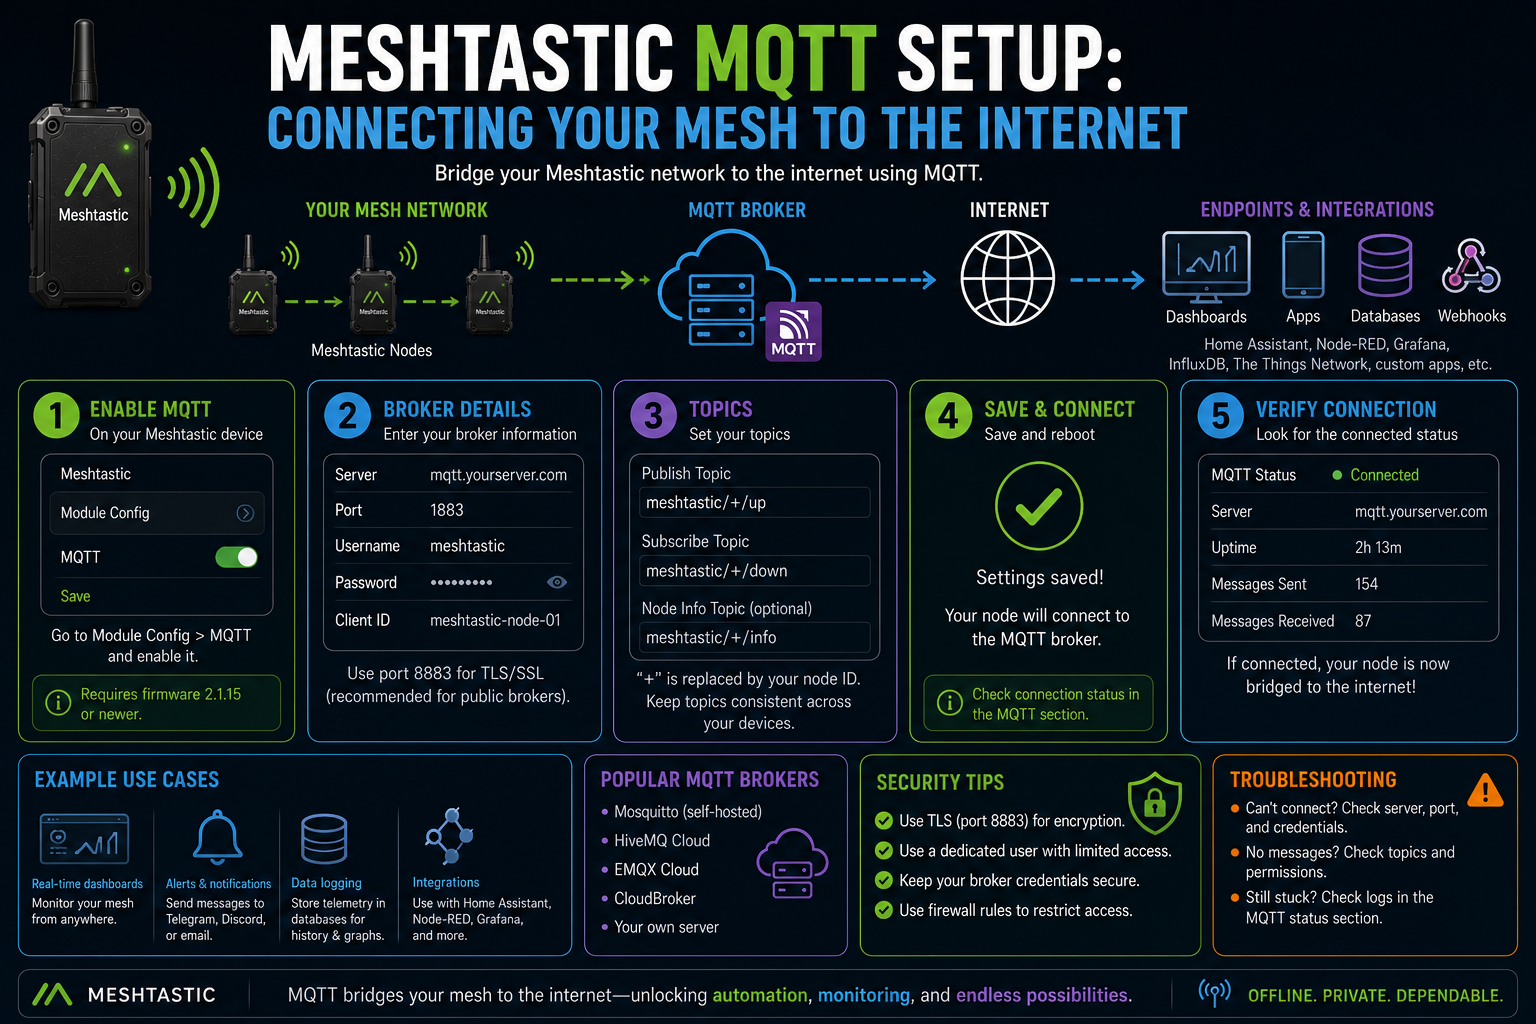
Getting it to work takes about 10 minutes once you understand the moving parts. There are just a few more steps than people expect.
What MQTT actually is
MQTT is a lightweight messaging protocol that has been a cornerstone of IoT for years. It works on a publish/subscribe model: devices publish messages to a central broker, and other devices subscribed to the same topic receive them.
Meshtastic uses it as a bridge. One node on your mesh connects to a broker over WiFi, forwards mesh traffic up to it, and receives traffic back down. From there, that traffic can reach any other Meshtastic node anywhere in the world that is also connected to the same broker.
The radio mesh handles local communication. MQTT handles the long-distance internet hop in between.
How the gateway node fits in
A Meshtastic node configured as an MQTT gateway acts as the internet-facing relay for your mesh. It needs a WiFi connection to reach the broker. ESP32-based devices such as the LilyGo T-Beam, T3S3, or Heltec WiFi LoRa boards can connect directly. Devices without WiFi can use your phone as a proxy instead.
When the gateway receives a radio packet from another node, it can forward it to the broker (uplink). Messages arriving from the broker get re-broadcast over the radio (downlink). Both directions are optional and configured per channel.
You only need one gateway node per mesh. Connecting multiple nodes to MQTT will cause duplicates as each one independently forwards the same packet.
Public broker or your own
Meshtastic runs a free public broker at mqtt.meshtastic.org. Port 1883 for unencrypted connections, port 8883 for TLS. No account required. You can connect to it immediately without any server setup.
It is useful for experimenting and for connecting with the wider Meshtastic community. If someone else in another city has their node on the same broker and the same channel, you can message them as if they were nearby.
The downside is that the public broker is shared. Your mesh traffic is visible to anyone subscribed to the same topics. For anything private or production-grade, you want your own broker. Mosquitto running on a Raspberry Pi is the most common choice. Hosted services like HiveMQ Cloud or a self-managed VPS instance both work too.
Setting it up in the app
In the Meshtastic Android or iOS app, open your device settings and navigate to Module Config, then MQTT. You need to fill in:
Server address (e.g.,
mqtt.meshtastic.org)Port (1883 for plain, 8883 for TLS)
Username and password (optional for the public broker, required for most self-hosted ones)
Whether to proxy MQTT through your phone rather than using the node's own WiFi
Enable the module, save, and the node will connect when it next has WiFi or a phone acting as a bridge. The app will show a connected status in the device info if it worked.
You can also configure MQTT from the web interface at meshtastic.local if your device is on WiFi, or via the Python CLI if you prefer that route.
Channel uplink and downlink: the part people miss
This is where most first-time setups stall. Enabling MQTT on the device is only half of it. You also need to enable uplink and/or downlink on each specific channel you want to bridge.
In the app, open the channel settings for the channel you want to use with MQTT. Two toggles matter here. "Uplink Enabled" sends that channel's messages up to the broker. "Downlink Enabled" injects broker messages into the mesh.
Enable only uplink, and you can monitor the mesh from an MQTT dashboard, but nothing comes back. Enable only downlink and messages from the broker reach your mesh, but nothing goes the other way. For a full two-way bridge, enable both.
Get this wrong, and the connection will appear to succeed while messages mysteriously fail to reach their destination. It catches almost everyone the first time.
What you can actually do with it
The most immediate use is range extension. A mesh in one city and a mesh in another, each with one gateway node, can exchange messages through the broker as if they shared a radio network. Neither side needs to be anywhere near the other.
Beyond that, MQTT opens up integrations. Anything that speaks MQTT can consume your mesh data. Home Assistant can pull in Meshtastic position updates, device telemetry, and text messages as automations. Node-RED can route data to dashboards or external services. InfluxDB and Grafana can graph sensor readings from nodes out in the field.
Remote monitoring is another practical use. A permanent rooftop node or a rural installation can have its traffic watched from a dashboard without anyone needing to visit the site.
The honest trade-offs
The public broker is best-effort. It occasionally goes down, and there is no guarantee of delivery.
Latency through MQTT adds a noticeable delay compared to direct radio. For text messages, it is fine, but real-time tracking will feel slightly sluggish compared to a direct radio link.
Meshtastic applies channel-level encryption before handing packets to MQTT, so the broker does not see plaintext. However, if you are using the default channel with its default shared key, anyone else using that key can read your messages anyway. Custom channel keys fix this.
MQTT also requires internet connectivity to function, which makes it a complement to the mesh rather than a substitute. If the WiFi goes down or the broker is unreachable, the local radio mesh keeps working. The internet bridge is an addition, not the foundation.
Where this fits in the bigger picture
Meshstastic MQTT is most useful when you already have a working local mesh and want to extend its reach or feed its data to a useful destination. A home base node with WiFi, connected to a private broker, suddenly becomes a window into your whole deployment.
The public broker is the right place to start. It lets you verify the setup is working without running your own infrastructure. Once you have seen messages flowing through it, switching to a self-hosted broker is straightforward: change the server address and credentials, and everything else stays the same.
Your mesh stays off-grid where it matters. MQTT just gives it a way to reach you when you want it to.